Monday, February 28, 2011

Eating through the Six nations #3: Ireland vs Scotland (Bacon n Cabbage and Cock-a-leekie soup)

I was supposed to put this post up yesterday, as that was when the game was played, but it was the 27th, which meant it was the day to post my Daring Baker stuff. So here it is :)

There are a lot of differing opinions as to what is the true traditional Irish dish. Some say lamb stew, more say its bacon and cabbage. Either are yummy dishes in my opinion :) Bacon and cabbage is much less work.


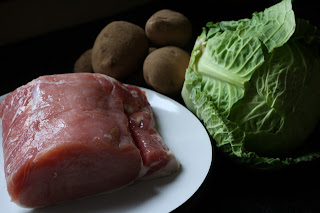
Bacon and Cabbage 
Bacon
Cabbage
Potatoes
 
 So all you do is put the bacon in a large pot and cover with water.
Bring the water to a boil, then dump out the water (this removes a lot of the salt in the bacon), re top-up with water and boil until the bacon is cooked. Meanwhile, slice up the cabbage and give it a good rinse
When the bacon is nearly done (after about 1.5 hrs on the second boil), add the cabbage and cook it right in with the bacon. The cabbage takes on the porky-salty-yummy flavour. Plus its more cost-efficient than boiling a second pot. 

Slice up the bacon, mash the potatoes you cooked at the same time (in a different pot), drizzle a little parsley sauce over it and enjoy!
VERDICT: Nom-nom-nom! Pretty yummy component for the Irish portion of this post!


Now for the Scottish:


Cock-a-Leekie Soup (From Traditional Scottish Recipes)

3lb chicken
3 slices streaky bacon
1lb stewing beef
2lb leeks
1 large onion (I had two small ones)
5 fluid ounces Scotch whiskey
4 pints water
1 tbsp dried tarragon (I used a few springs of fresh tarragon as I couldn't find dried anywhere)
salt and pepper


Mix the whiskey, tarragon and sugar in the water (hmmm ... no sugar listed in ingredients, so I left it out). Chop up the bacon and place the chicken, bacon and beef in a large bowl and pour over the whiskey marinade. Leave to soak overnight. Place the entire mixture in a large soup pot. Chop up the leeks (reserving one) and onion and add to the pot. Salt and pepper to taste. Bring to the boil, cover and simmer for two hours, removing any scum as required. Remove the chicken from the pot, remove skin and bones. Chop the meat into small pieces and return to the pot. Cut up the beef, if required. Add the last chopped leek and simmer for 10-15 minutes.

VERDICT: Never again. Sugar may have made a difference, but there was a strong whiskey taste that I am not a fan of. There was no alcohol left after the long boiling time, so no worry of getting tipsy, but it tasted like a lump of whiskey with the texture of chicken. So not such a fan of this traditional Scottish dish. But that's ok, at least I tried it :)

Result: Ireland 21 - Scotland 18

So, what was one dish you tried but won't be attempting again?


Peace,

Jenn x
Sunday, February 27, 2011

Panna Cotta and Florentines - Daring Bakers February 2011

I am now a Daring Baker!


After repeatedly seeing the amazing things made by Not Quite Nigella and Ria, I was inspired to try it out. I love to bake and the unique treats made would provide me with a challenge. I'd get to make things I haven't heard of before (like Florentines!) and be part of a wonderful online community. What's not to love?

So keep an eye, on the 27th of each month the daring treats will be published.

The challenge for this month was hosted by MissMallory of a sofa in the kitchen, who decided on panna cotta and Florentines. I had never made panna cotta before and had never even heard of Florentines, so it was a great beginning. I had great ambitions to make a jelly of one flavour to work with the flavour of the panna cotta, but I couldn't find a recipe for banana jelly and I knew the month was going to get away from me, so I decided to start small and focus on chocolate panna cotta. I followed David Lebovitz's recipe for perfect panna cotta and added some chocolate so it wasn't a plain vanilla panna cotta. Here's how I made it:


Perfect (Chocolate) Panna Cotta (adapted from David Lebovitz)

2 cups heavy cream
1/4 cup sugar
1 tsp vanilla bean paste
1 packet powdered gelatin
3 tbsp cold water
75g chopped dark chocolate


When I was thinking about flavour combinations with chocolate, I decided not to go with orange. I'm not a fan of the chocolate/orange pairing. But I didn't read the label on the chocolate very well:


... so chocolate/orange panna cotta it was!


Heat the heavy cream and sugar in a pot. Once the sugar is dissolved, remove from heat and stir in the vanilla


 and the chopped chocolate, stirring until all the chocolate is melted.


 Lightly oil 4 custard cups with a neutral tasting oil.

Sprinkle the gelatin over cold water in a medium sized bowl and let stand for 5-10 minutes.

 
this stuff gets pretty solid!


Pour the warm panna cotta mixture over the gelatin and stir until the gelatin is completely dissolved. Divide the panna cotta mixture into the prepared cups then chill them until firm, at least 2 hours.

And there was cookies, which makes everything better :) The challenge said 'Florentines', so I looked in my favorite dessert cookbook, and there was a recipe. I just didn't realize until composing this post that the Daring Bakers used a different recipe. I hope I don't get kicked out for making a completely different biscuit :S


quarter recipe Pâte Sucrée (I'll post this recipe another time)
90 grams sugar
1 1/2 tbsp golden syrup (or light corn syrup)
50 grams unsalted butter
40 grams honey
52 ounces heavy cream
zest of half an orange
125 grams sliced almonds
40 grams candied pineapple, diced

Combine the sugar and corn syrup with 3 tbsp of water in a heavy-bottomed pot over medium heat. Cook, stirring occasionally with a wooden spoon, for about 4 minutes, or until the mixture begins to caramelize.
Stir in the butter and honey and bring to a boil. Immediately add the cream and zest and again bring to a boil. Lower the heat and simmer for about 10 minutes or until the mixture reaches 124C (255F) on a candy thermometer.


Remove the pan from the heat and stir in the almonds and candied pineapple. Grab your blind-baked Pâte Sucrée. Pour the hot mixture into the pastry and spread into an even layer using an offset spatula. Bake at 177C (350F) for about 12 minutes or until the candied mixture is bubbly (mine were done after 7 minutes).

 This was a little small so it was a taster :)

Set the pan on a wire rack to cool, then using a sharp knife cute into 1 inch squares. Serve or store, airtight, at room temperature for up to 4 days.

Verdict: I wasn't mad about the panna cotta. We went out for dinner a few nights ago and I ordered the strawberry panna cotta on the menu to see how different it was from mine and I didn't like it either. I know David Lebovitz is amazing with desserts, so I think its just my taste.

The Florentines, however, were fantastic. They were a lovely, delicate yet flavourful biscuit that A couldn't get enough of. He said they were perfect comfort cookies. I also served them to the youngest Chef to ever win a Michelin star (any idea who he is??) and he took 3 of them, so they gotta be good. I was pretty proud :D

So tell me, do you like panna cotta? And have you ever tried this version of Florentines? And do you know which Chef I'm talking about?


Peace,

Jenn x

Thursday, February 24, 2011

Candied Pineapple


I am not a fan of candied fruit. I used to love it (I only ordered Shirley Temples so I could have the maraschino cherry) but as I've gotten older I've got a slightly more discerning palate. Actually no - once I learned that some tubs labelled 'glace cherries' listed rutabega as the first ingredient, I got turned off.

Yup, what some think is candied fruit, is actually turnip. Aren't artificial flavourings amazing?

Yuck.

So when I saw a recipe I was going to make that required candied fruit, I knew I had to figure out how to make my own if I wanted to try it. I found a recipe for candied pineapple and thought that since I really like pineapple, I'd give it a go.

Candied Pineapple (see recipe here)
1 cup granulated sugar
20 oz pineapple (canned slices, packed in own juice, drained and 1/3 cup juice reserved)
2 tbsp golden syrup or light corn syrup

Put the sugar, juice and corn syrup into a pan. Bring to a boil then reduce the heat. Carefully add a single layer of pineapple rings, ensuring not to crowd the pan.
Cook for 12-16 minutes or until slices are golden and have transparent edges. Carefully turn every 4 minutes, ensuring you don't tear the rings.

When complete, move slices to a wire rack to cool.

Add remaining slices to hot syrup and repeat as above until all the pineapple is cooked.

When slices have cooled comletely, coat with granulated sugar. Let stand on wire rack for at least 24 hours to dry. Recoat with granulated sugar and store in an airtight container for up to 2 weeks.
 
I was pleasantly surprised with how well this came out. It was lovely!

So how do you like your fruit - candied, dried, fresh or sherried? :)


Peace,

Jenn x

1 cup granulated sugar

Wednesday, February 23, 2011

Satay Sauce - Yum!

I have only recently been introduced to satay sauce.

I know.

I have no idea why it took so long either.

When I made spring rolls yesterday, I knew I had to dip them in satay sauce. But I didn't want to use the bottled stuff - I wanted to give it a go.

I started google-ing recipes (what is the correct way to write 'google-ing'? Anybody know?) and didn't find any that worked for me (meaning: I didn't have any coconut oil and a whole lot of em called for it). So I pulled stuff out of my cupboards and threw one together.

Like the non-traditional salad rolls, this satay sauce isn't like one you'll find in a restaurant, but it was really good. It went with the salad rolls really well and I think it would be awesome on chicken or beef too. If some makes it past another session of salad rolls, I'll let you know if it works :)

Satay Sauce 
1 tbsp sambal (Indonesian sweet chili sauce)
80g peanut butter
1/2 tsp malt vinegar
juice of one lemon
2 tbsp grated ginger
1 tsp sherry
1/2 tsp sesame oil
2 tbsp soy sauce
2 tbsp brown sugar


Note: That sambal is seriously good stuff.


Note: I used crunchy peanut butter


Note: I miss Kraft crunchy peanut butter

Throw everything into a pot and warm until its a homogeneous mixture and the sugar is all dissolved.


Adjust to taste (I may have added more ginger and sesame oil) and enjoy!


It was really good with my salad rolls!

Do you like satay sauce? Do you have a favorite recipe?


Peace,

Jenn x

Totally Untraditional Vietnamese Salad Rolls

I was stoked when I found these in my tiny fruit and veg shop.

I couldn't believe it. In a country where I cannot find pearl onions for the life of me and sushi rice has only shown up in the last year. Totally stoked! I knew they would be just the thing for lunch in a rush. And they were! If you haven't tried them before, I highly recommend them. They are very tasty, fun to make and a very enjoyable way to have your veggies. And they are fun to make.

I enjoy food I have to interact with (a grown up way of saying 'I like to play with my food') :D

First off, get all your fillers ready and chopped finely. Once you get the wrappers ready, you'll need to assemble them quickly. I used lettuce, spinach, carrots, cucumber, avocado and shrimp.

The wrappers are pretty firm when you take them out of the wrapper, so you gotta soften them up a bit. Here's where the fun starts!

Put the wrapper in a shallow dish with warm water

Leave it in until it begins to soften. This happens pretty quickly depending on the temperature of the water, maybe 10 seconds. Don't leave it too long or it will lose elasticity and just fall apart.

Shake it off and put it on a plate.

Start piling with filling, keeping in mind that the stuff you put on the bottom will be visible on the top of the roll when you're done. Arrange your stuff lengthwise. Fold the wrapper over the ends, then fold the bottom up and roll the whole thing to close. Here's a video that explains it a little better if that didn't make sense:


Once they were all wrapped up I dipped them in my satay sauce, which I'll post the recipe for tomorrow. They were totally delicious!


I know what I'll be having for lunch tomorrow :)

So what did you have for lunch today?


Peace,

Jenn x

Monday, February 21, 2011

French Onion Soup

I took A to meet my family for the first time a few years ago. We had 2 weeks planned and since it was his first time in Calgary we spent a few days travelling around, to give him more of an idea of what Canada was like. We headed into nearby Jasper and Banff, which are beautiful towns in the Rocky Mountains. As I grew up in the next province, and not in Calgary where all my family have moved to, it was nice to take him somewhere that resembled where I grew up. And I suffer major mountain withdrawal living here, so I needed to spend some time in the Rockies too.

While we were staying in Jasper we went out for dinner one evening and A ordered French Onion Soup. In my years working in kitchens I tried French Onion Soup maybe twice, and it was never good, so I decided I didn't like it.

Boy was that a mistake.

The soup A had (it was at The Keg, by the way) was so So SO good. I was blown away. How had I been missing out on this? Why had I never tried a nice bowl of French Onion Soup? My days of living without such yumminess were over. So of course I had to find a recipe so I could recreate this amazing-ness at home.I found this recipe and gave it a shot. I've tweaked it a bit to come up with a version I like. I've made this for guests, family at home and for myself and A a good bit. And everyone says its better than any they've had in a restaurant. I even get phone calls asking for my recipe from people in Canada that heard I had a good un. Its that awesome.

French Onion Soup (Adapted from allrecipes.com)

Serves 4

35g unsalted butter
460g sliced onions (I used 6 small-medium sized onions)
1200 ml beef broth
60ml sherry
2g dried thyme
4 slices bread, lightly toasted
cheese of your choice (recommended : Swiss)

Get everything together
See? Not too much. You can do this :)

Melt the butter in a pot and add the sliced onions. Cook them until they are nice and brown and caramelized and sweet and its difficult to not take the pot off the stove and just tuck in.


My-oh-my-this smells amazing!!
Add the beef broth, sherry and thyme to the onions. Simmer for 30 minutes.


Ok, this smells MORE amazing!

While the soup is simmering, get out the cute little dishes you bought when you discovered the beautifulness that is French Onion Soup ...


... and cut a few slices of the fresh loaf of bread you made and toast them ...


... then put some soup in the cute little dishes, pop a slice of bread on top and grate cheese over it all.
Throw these puppies under a grill until the cheese is melted and crispy around the edges...

Ok this isn't melted enough, but I couldn't stand it anymore.

I just had to tuck in. 

I'm ok with that. 

Maybe another time I'll be more patient. But it was pretty awesome anyway :)

Hope you try it soon!!

So whats a food thing you didn't like for ages then realized it was a missing love-of-your-life? ;)


Peace,

Jenn x

Sunday, February 20, 2011

Chicken and Broccoli Pasta Bake

I love pasta bake. You can put loads of veggies, mix a whole bunch of flavours, its totally easy and it freezes well. And I have yet to meet anyone that doesn't like them, which makes it a good dish for company.

I made one tonight and decided to share it with you. This is the version I most frequently make. I'm not a huge fan of broccoli, but I like it in this so I put a whole bunch in and leave out other veggies. But its also good with zucchini, mushrooms, carrots, asparagus - pretty much any vegetables you and your family like.


Chicken and Broccoli Pasta Bake
Serves 7

1 onion
large head of broccoli
4 chicken breasts
2 tins of cream soup (I used Weight Watchers chicken soup and Erin low fat cream of mushroom soup)
2 cups pasta (I used whole wheat fusili)
1 cup grated cheddar cheese

Put a pot of water on to boil and add the pasta. Cook until its al dente.
Get everything together


Chop up the broccoli, onion and chicken

Add the onion and chicken to a pan and cook until the chicken is no longer pink. 

Once the chicken is done, throw in the broccoli 


Continue to cook until the broccoli starts to soften, maybe 3-5 minutes. We still want the broccoli to have a bit of crunch.

Add the broccoli/chicken/onion mixture to the pasta. 


 Throw the tins of soup on top and mix together. Put in a dish, top with cheese and bake until bubbling and the cheese is melted.


Serve with a side salad and enjoy with pleasure :)

I know it doesn't look like much but its really tasty. I made one dish for us to have tonight and froze another dish (without the cheese on top) that will serve 2 as well as two individual dishes. So that made a good few meals for little effort and not a lot of money. And its pretty healthy too so that's important.


Do you have any cheap, easy, go-to meals?


Peace,


Jenn x

Saturday, February 19, 2011

Crème Brûlée - P Dub style

Another request for some cooking when I arrived home in December was from my amazing Nana - 'I'd like you to make Crème Brûlée before you go back please'.

I had never made this, which was great. I love trying new things. So when I found vanilla beans at Costco (I miss Costco) I remembered that the Pioneer Woman posted a recipe using vanilla beans, so away I went.

I couldn't possibly explain how to make the recipe as good as Ree so I'll direct you to her recipe.

And I'll tell you, it turned out wonderful. Totally delicious. Really good. Yummy and a half. Another recipe I was impressed that I made, and that our guests were impressed with. They had a lovely consistency and the vanilla flavour deepened with time. And as I'm a vanilla monster, that's a wonderful thing :) I did have to give most of them away (I think the recipe made 10 or 12 of these little ramekins, so obviously we couldn't keep them nearby. And it was Christmastime, the season of sharing calories) which made a lot of people happy.

I think the real reason my amazing Nana wanted to make them was to play with the torch

She rocked it. She's cool.

But a tip: check to see if there's a constant flame button, cause holding down the ignitor for ages hurts. Hence why I'm double fisting it in the first picture. My thumb is still a little tender.

This is an awesome dessert if you have company because you can make it the day before and leave it in the fridge (or outside, if you make it in the winter in Canada, which I did :) and all you have to do is torch the tops before you're ready to serve. Don't caramelize the sugar ahead of time because the pièce de résistance is the crispy top and if its left, this will soften and it won't be as fabulous.


So try it. Its good :)


Have you tried crème brûlée? Are you a fan?


Have a great weekend!!!


Peace,


Jenn x


Trust Martha (spinach and cheese souffle)

On Christmas morning I opened a cookbook that was only French food. My favorite aunt proclaimed 'I want a souffle before you go back to Ireland'.

Gulp.

I had never made one before. I had never tasted one before. Heck, I had never even seen one outside of a book. I had heard, however, that they can be tricky to get right. And there wasn't a souffle recipe in the cookbook she'd just given me. Huh.

A few days later I headed to search a used book store for a copy of 'Mastering the Art of French Cooking' by Julia Child, and while I didn't get what I was looking for, I did see a section with books by Martha Stewart. After snooping, I picked up this one. And she covered souffles.

Now I've never been a huge Martha fan. I think she is incredibly creative but for some reason I never took a keen interest in trying out her recipes or crafts or decorating or any of the millions of things she does. But she did give good, clear, step-by-step instructions to guide me through my first souffle. And believe it or not, it worked.


Now all I am able to do is tell you about this. I left the cookbook in Calgary (I buy things at home then leave them there as a temptation to get me to move back sooner. Hmm ... hasn't worked yet ...) but I'm telling you that they are seriously easy. And, in my opinion, the perfect brunch idea.

I did find a similar recipe on Martha's website which looks pretty much like the recipe I used, except I used cheddar instead of Gruyere cheese. And one tip that was in the book that isn't in the recipe is that once you butter and dust the dish with the breadcrumbs, chill the dish before you pour the souffle filling in. I'm not sure if its important or not, but it was part of the instructions and mine turned out pretty great.


It didn't take too long to throw together, and like with Yorkshire puddings, it is important to have the oven heated before putting the souffle in and very important to make sure the oven is left closed until you think its finished.

We had a few of my mom's friends over for lunch and this is what I made. One of her friends has had souffle before and said it was just like one she'd had in a restaurant. I thought that was pretty good considering I was going in blind. We had it with baked potatoes and a salad (not pictured) and it was delish!


In the souffle I made, I dusted the dish with grated Parmesan cheese instead of the breadcrumbs in the recipe I've linked above and it was pretty tasty.

So tell me, have you tried a souffle? Have you made one before?


Peace,

Jenn x